Practical Geometry

Practical Geometry - Sub Topics

Practical Geometry is all about creating various shapes through construction. It is a fundamental aspect of geometry that empowers us to skillfully draw various shapes with accuracy. It plays a crucial role in developing spatial reasoning and is widely used in fields such as mathematics, engineering, architecture and design. In this chapter, we will delve into the significance of practical geometry and explore how it plays a vital role in creating 2D shapes with the right measurements.

  • Practical Geometry
  • Construction of a Line Segment
  • Construction of an Angle
  • Construction of Triangles
  • Construction of Quadrilaterals
  • Solved Questions on Practical Geometry (Constructions)
  • Practical Geometry

    Practical Geometry is a branch of geometry that involves the construction and drawing of different shapes and figures using tools like compasses, rulers and protractors. In practical geometry, we mainly focus on drawing these shapes accurately.

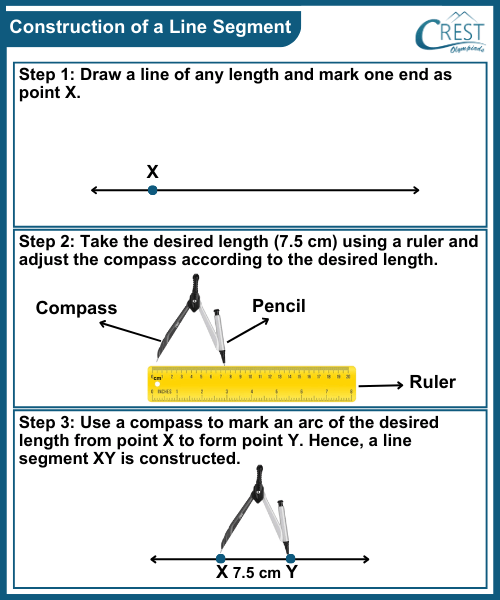
    Construction of a Line Segment

    Constructing a line segment of a specific length using a compass and ruler is shown.

    cmo-practical-c8-1

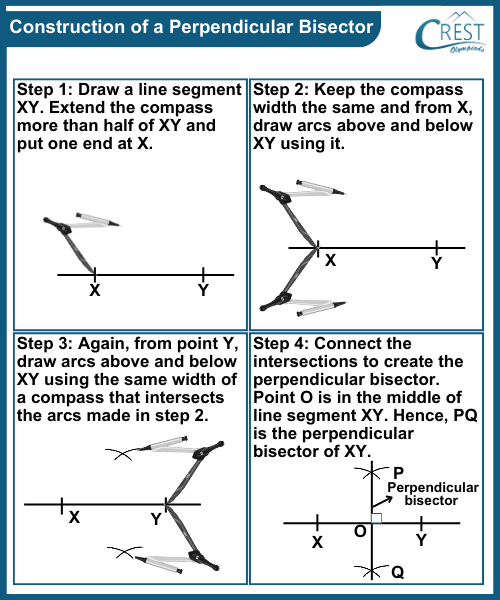
    Construction of a Perpendicular Bisector

    Constructing a perpendicular bisector of the given line segment using a compass and ruler is shown.

    cmo-practical-c8-2

    Example: Which of the following quadrilaterals PQRS is constructed using the line segment QS?

    a) Parallelogram
    b) Rhombus
    c) Rectangle
    d) Trapezium
    Answer: b) Rhombus

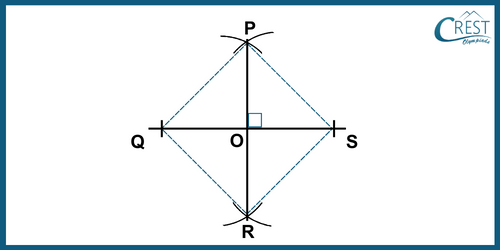
    Explanation: The steps used to construct a quadrilateral PQRS using the diagonal QS.
    Step 1: Draw the line segment QS. Extend the compass more than half of QS and put it at vertex Q.
    Step 2: Use a compass to measure the length of the segment QS, then place the compass on vertex Q of the line segment QS and draw arcs above and below QS.
    Step 3: Without changing the compass width, place the compass on the vertex S of the line segment QS. Draw an arc above QS that intersects at P and draw another arc below QS that intersects at R.
    Step 4: Connect the points where the arcs intersect to form the perpendicular bisector PR. The intersection points of the lengths determine the vertices of the Quadrilateral PQRS.

    cmo-practical-c8-3

    Thus, PR is the perpendicular bisector of QS and PR and QS are the diagonals of the quadrilateral PQRS. Hence, a quadrilateral PQRS is a rhombus because the diagonals are perpendicular bisectors of each other.

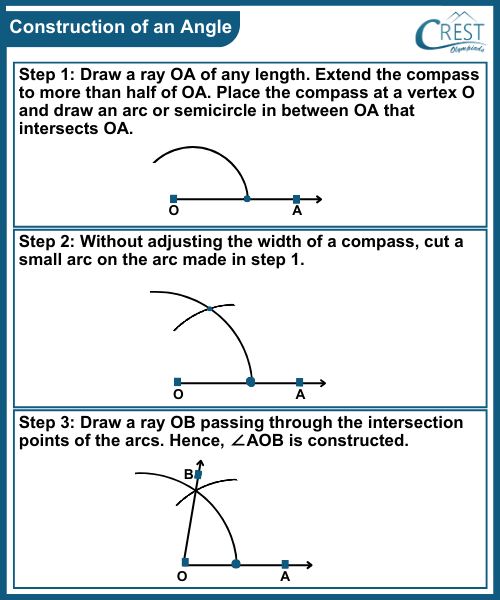
    Construction of an Angle

    Constructing an angle of specific degrees using a compass and ruler is shown.

    cmo-practical-c8-4

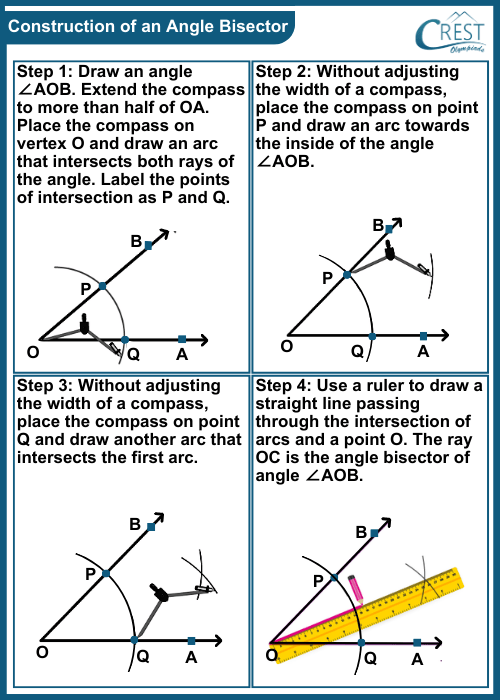
    Construction of an Angle Bisector

    Constructing an angle bisector using a compass and ruler is shown.

    cmo-practical-c8-5

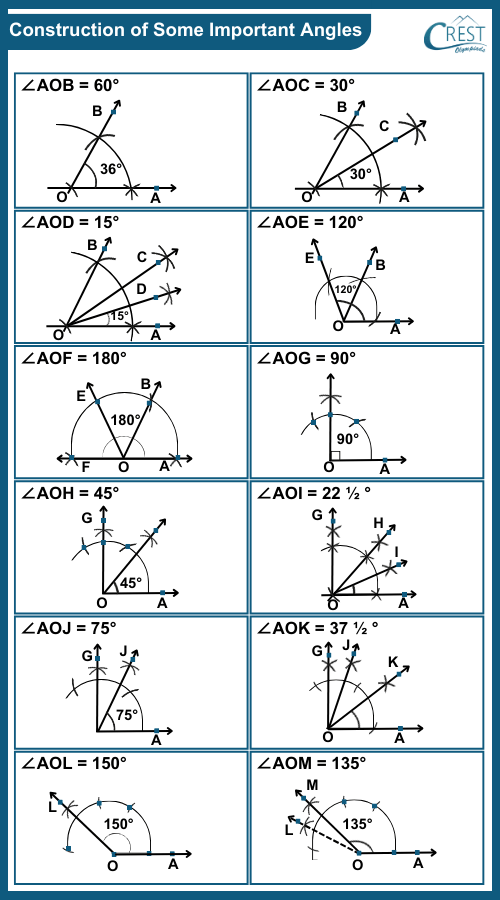
    Construction of Some Important Angles

    Constructing angles using a compass and ruler is shown.

    cmo-practical-c8-6

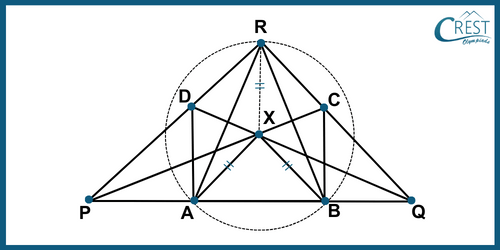
    Example: Which of the following statements is true in light of the constructed figure?

    cmo-practical-c8-7

    Statement I: The line segment XP is the angle bisector of angle ∠DPA.   
    Statement II: The line segment QX is the angle bisector of angle ∠DXC. Statement III: ∠XAB is equal to ∠XBA. 
    Statement IV: ∠DXA is equal to ∠CXB. 
    Statement V: ∠ARX is equal to ∠APN.

    a) Only statements I, II and IV are true.
    b) Only statements I, II and V are true.
    c) Only statements I, III and IV are true.
    d) Only statements I, III and V are true.

    Answer: d) Only statements I, III and V are true.

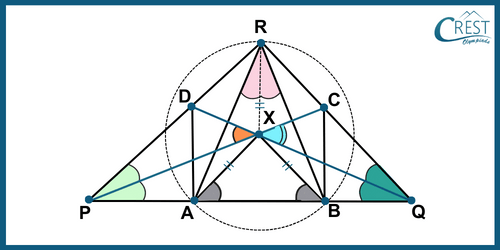
    Explanation: The labelled figure is shown as:

    cmo-practical-c8-8

    From the figure, the correct statements are as follows:

    Statement I: The line segment XP is the angle bisector of angle ∠DPA.  
    Statement II: The line segment QX is the angle bisector of angle ∠BQC. 
    Statement III: Angles opposite to equal sides are equal. Hence, ∠XAB is equal to ∠XBA. 
    Statement IV: ∠DXA is not equal to ∠CXB. 
    Statement V: ∠DPX is equal to ∠APN. 
    Only statements I, III and V are true.

    Construction of Triangles

    Constructing triangles typically involves using basic geometric tools such as a compass and ruler to create triangles with specific characteristics.
    Here are common constructions involving triangles:

    1. Constructing a Triangle with Given Lengths of Sides:

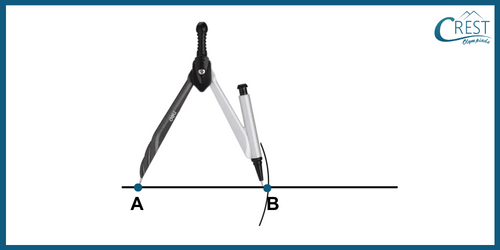
    STEP I: Start by drawing the first side AB of the triangle. Use the ruler to measure and accurately draw the line segment AB corresponding to the given side length.

    cmo-practical-c8-9

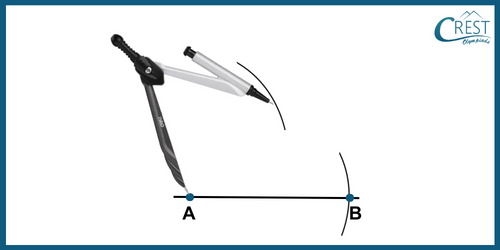
    STEP II: Place the compass on vertex A and adjust its width to match the length of the second side AC. Draw an arc.

    cmo-practical-c8-10

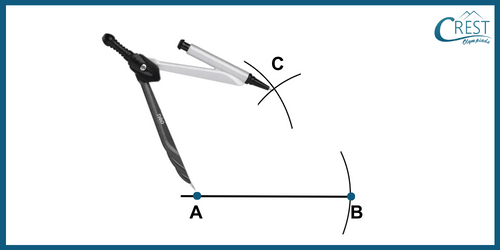
    STEP III: Then place the compass on vertex B and adjust its width to match the length of the second side BC. Draw another arc that intersects the arc made in Step II. Mark the intersection of the arcs as C.

    cmo-practical-c8-11

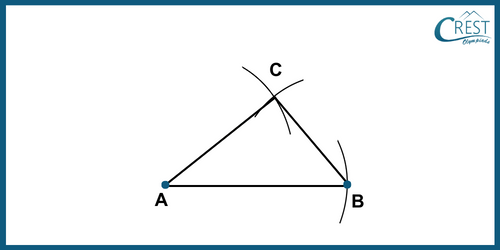
    STEP IV: Join AC and BC to form a triangle with given side lengths.

    cmo-practical-c8-12

    2. Constructing an Equilateral Triangle:

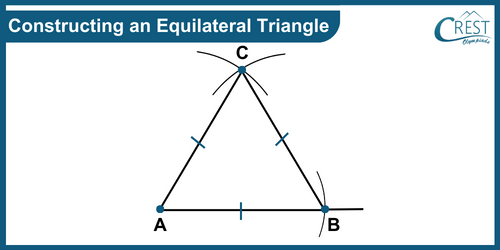
    To construct an equilateral triangle (three sides equal), the fixed lengths are used to draw arcs. Make a first arc from vertex A to form vertex B on the line. From A, draw the second arc. Then from B third, another arc intersects the second arc. Mark the intersection of the arcs as C. Join AC and BC to form an equilateral triangle.

    cmo-practical-c8-13

    3. Constructing an Isosceles Triangle:

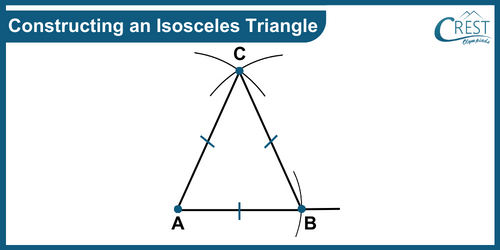
    To construct an isosceles triangle (two sides equal), draw the base AB and then use the compass to create arcs of equal lengths from the vertices of the base AB. Connect the vertices of the base AB to the intersection point C of the arcs.

    cmo-practical-c8-14

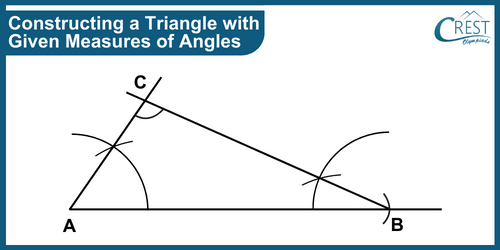
    4. Constructing a Triangle with Given Measures of Angles: Draw a line segment AB of the given length or any length (if the length of side AB is not given). Draw specific angles ∠A and ∠B. The intersection of emerging lines from vertices A and B form vertex C and hence, angle C is formed. The angles you know should also fit with the rule that the sum of angles in a triangle is 180°.

    cmo-practical-c8-15

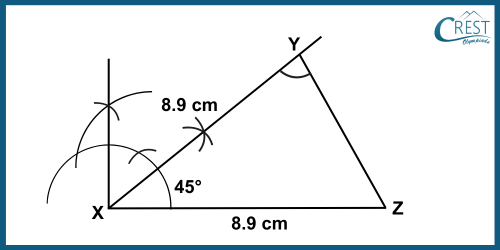
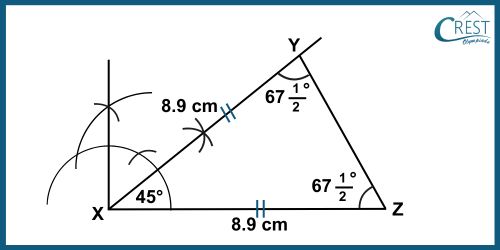
    Example: What is the measure of ∠XYZ in the following construction of a triangle?

    cmo-practical-c8-16

    a) 52 ½°
    b) 57 ½°
    c) 62 ½°
    d) 67 ½°

    Answer: d) 67 ½°

    Explanation: The given figure is an isosceles triangle where XY = XZ = 8.9 cm. Angles opposite to equal sides are equal.

    Let the equal angle be x.

    Sum of angles = 180°
    ⇒ x + x + 45° = 180°
    ⇒ 2x = 180° − 45°
    ⇒ x = 135°/2
    ⇒ x = 67 ½°

    The measure of ∠XYZ is 67 ½°.

    The labelled figure of an isosceles triangle XYZ is shown as

    cmo-practical-c8-17

    Construction of Quadrilaterals

    Here is an explanation of how to construct a quadrilateral:

    Parts You Need to Know: To construct a quadrilateral correctly, you should know at least five parts of a quadrilateral:
    Type I: The lengths of all four sides and one diagonal.
    Type II: The lengths of three sides and the lengths of both diagonals.
    Type III: The lengths of three sides and the two angles.
    Type IV: The three angles and the lengths of two sides.
    Type V: Four consecutive sides and an included angle (an angle between any two adjacent sides).

    Important Rules: Five parts of the quadrilateral should also follow these rules to be sufficient and must also be satisfied.
    a. The lengths of the sides should follow the triangle inequality. This means they should be arranged so that the sum of the lengths of any two sides is greater than the length of the third side.
    b. The angles you know should also fit with the rule that the sum of angles in a triangle is 180°.

    Sketching a quadrilateral: Before you start constructing a quadrilateral, it is a good idea to draw a rough sketch of the shape and put down the data you have. This will make it easier to follow the construction steps.

    Type I: The lengths of all four sides and one diagonal of a quadrilateral are given.

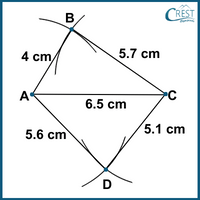
    Construct a quadrilateral ABCD if AB = 4 cm, BC = 5.7 cm, CD = 5.1 cm, AD = 5.6 cm and AC = 6.5 cm are given.

    ⇒ The steps for constructing a quadrilateral are as follows:

    1) Draw a line segment AC of length 6.5 cm using a ruler.
    2) Using a compass, draw an arc with a length of 4 cm from vertex A (Above AC) and draw an arc with a length of 5.6 cm from vertex A (Below AC).
    3) Move to point C. Using a compass, draw an arc with a length of 5.7 cm from vertex C (Above AC) and draw an arc with a length of 5.1 cm from vertex C (Below AC).
    4) The point above AC where these two arcs intersect is named B and the point below AC where these two arcs intersect is named D. Join the vertices A, B, C and D.

    The actual sketch of a quadrilateral ABCD is constructed as follows:

    cmo-practical-c8-18

    Type II: The lengths of three sides and the lengths of both diagonals  of a quadrilateral are given.

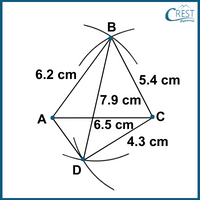
    Construct a quadrilateral ABCD if AB = 6.2 cm, BC = 5.4 cm, CD = 4.3 cm, AC = 6.5 cm and BD = 7.9 cm are given.

    ⇒ The steps for constructing a quadrilateral are as follows:

    1) Draw a line segment AC of length 6.5 cm using a ruler.
    2) Using a compass, draw an arc of length 6.2 cm from vertex A and an arc of length 5.4 cm from vertex C. These arcs form an intersection point B above the line segment AC.
    3) Using a compass, draw an arc of length 4.3 cm from vertices C and an arc of length 7.9 cm from vertices B. These arcs form an intersection point D below the line segment AC.
    4) Join the vertices A, B, C and D.

    The actual sketch of a quadrilateral ABCD is constructed as follows:

    cmo-practical-c8-19

    Type III: The lengths of three sides and the two angles of a quadrilateral are given. 

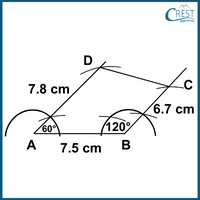
    Construct a quadrilateral ABCD if AB = 7.5 cm, BC = 6.7 cm, AD = 7.8 cm, A = 60° and B = 120° are given.

    ⇒ The steps for constructing a quadrilateral are as follows:

    1) Draw a line segment AB of length 7.5 cm.
    2) Construct ∠A with a measure of 60° and ∠B with a measure of 120°.
    3) From point B, cut off an arc of radius of 6.7 cm on the ray of 120° to form the vertex C.
    4) From point A, cut off an arc of radius of 7.8 cm on the ray of 60° to form the vertex D. Join the vertices A, B, C and D.

    The actual sketch of a quadrilateral ABCD is constructed as follows:

    cmo-practical-c8-20

    Type IV: The three angles and the lengths of two sides of a quadrilateral are given.

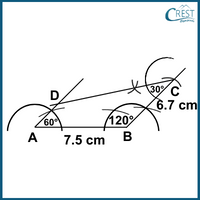
    Construct a quadrilateral ABCD if AB = 7.5 cm, BC = 6.7 cm, A = 60°, B= 120° and C = 30° are given.

    ⇒ The steps for constructing a quadrilateral are as follows:

    1) Draw a line segment AB of length 7.5 cm.
    2) Construct ∠A with a measure of 60° and ∠B with a measure of 120°.
    3) From point B, cut off an arc of radius of 6.7 cm on the ray of 120° to form the vertex C.
    4) Draw an angle ∠C with a measure of 30° at the vertex C which intersects at the line segment formed by 30°. These intersecting lines meet at point D. Join the vertices A, B, C and D. 

    The actual sketch of a quadrilateral ABCD is constructed as follows:

    cmo-practical-c8-21

    Type V: Four consecutive sides and the included angle of a quadrilateral are given.

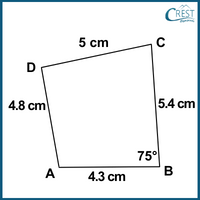
    Construct a quadrilateral ABCD if ABC = 75°, AB = 4.3 cm, BC = 5.4, CD = 5 cm and DA = 4.8 cm.

    The rough sketch of the given quadrilateral is as follows:

    cmo-practical-c8-22

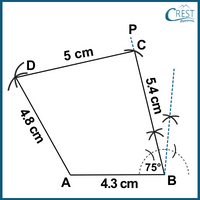
    ⇒ The steps for constructing a quadrilateral are as follows:

    1) Start by drawing a line segment AB and make it 4.3 cm long.
    2) At point B, draw an angle called ∠PBA and it should measure 75°.
    3) From point B, draw another line segment BC which is 5.4 cm long.
    4) From points C and A, make little marks (arcs) with a radius of 5 cm from point C and 4.8 cm from point A. These arcs will cross each other and where they meet and mark that point as D.
    5) Now, draw lines to connect point A to point D and from point D to point C. You shall now successfully construct a quadrilateral called ABCD.

    The actual sketch of a quadrilateral is constructed as follows:

    cmo-practical-c8-23

    Example: What is the general formula for the number of attributes required to construct a quadrilateral of n sides?

    a) n + 1
    b) 2n + 1
    c) n − 1
    d) 2n − 1

    Answer: a) n + 1

    Explanation: To construct a quadrilateral correctly, you should know at least five parts (attributes) of a quadrilateral.

    If to construct a quadrilateral of n sides, you should know at least (n + 1) parts (attributes) of a quadrilateral.

    Share Your Feedback

    CREST Olympiads has launched this initiative to provide free reading and practice material. In order to make this content more useful, we solicit your feedback.

    Do share improvements at info@crestolympiads.com. Please mention the URL of the page and topic name with improvements needed. You may include screenshots, URLs of other sites, etc. which can help our Subject Experts to understand your suggestions easily.

    Maths Related Topics for Class 8

    70%